Cheap Vegan Chick
  • Home
  • Coupons & Tips
    • Find Vegan Coupons
    • Print Coupons (Redplum)
    • Online Coupon Search
    • Store Coupon Policies
    • How to Stack Coupons
    • Vegan Extreme Couponing 101
  • Find Deals
  • Make Money
  • Resources
  • About
    • About
    • FAQs
    • Disclaimer
  • Contact Me
  • Blog

DIY Crafts: How to Decorate with Driftwood #diy #crafts

7/2/2016

0 Comments

 
DIY Driftwood Crafts
Try these easy projects to create inexpensive, nature-inspired, DIY treasures for your home.
 
I have always loved driftwood and have long thought it to be a great addition to indoor and outdoor décor. Incorporating driftwood into your décor is a great way to bring nature into your home or landscaping and is an inexpensive DIY craft.

Decorating with Driftwood: Selecting your Driftwood

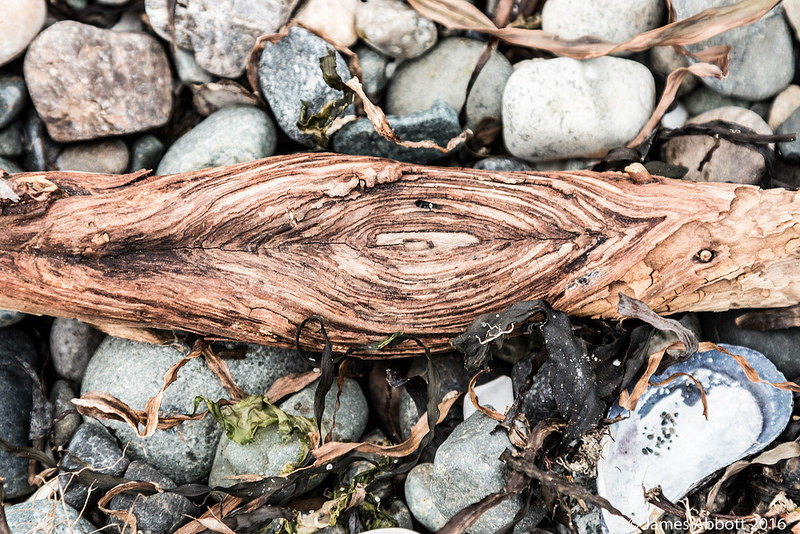
The first things to consider when selecting driftwood are cleanliness, its purpose in the ecosystem and the infestation factor. Before you drag that hunk of driftwood off the shore, be sure that it is not providing shelter for local wildlife. For example, on a beach it may be protecting a tide pool or providing a home to small shore animals, or in a lake or stream, it could be acting as a barrier to protect young fish or as shelter for crawdads. Driftwood could also be directing the flow of water, limiting erosion or providing shade for photosensitive flora, so as best you can, make sure you only remove driftwood that will have a minimal impact on the surrounding environment.
 
Once you have determined that the ecosystem will be safe upon removal of your driftwood, check the wood for cleanliness and possible infestation. This largely depends on how long it has been on the shore. Make sure you will be able to clean it up to suit your standards before you lug it to your car, truck or bike for transport.
Driftwood

Decorating with Driftwood: How to Clean Driftwood

Smaller pieces of driftwood can be cleaned by simply boiling them in a pot on the stove. Place the driftwood in the pot and cover with water, then boil and drain. This process can be repeated if the driftwood isn’t quite as clean as you would like it to be after the first boil. Larger pieces of driftwood (and smaller ones as well if you don’t feel like using one of your pots to boil them) can be cleaned with a hose or hot water and a scrub brush.

Decorating with Driftwood: Staining and Bleaching

I prefer to use driftwood in its natural state; however, it is possible to stain and varnish the wood in the same manner that you would stain and varnish other unfinished wood projects. If you choose to stain and/or varnish your driftwood, you will need to take special care in making sure that the driftwood is clean and has dried completely before you begin.
 
Another way of changing the color of your driftwood is to use a bleach and water combination to scrub it. This will clean the wood and lighten the color in most cases. Keep in mind that bleach is a harsh substance and you should use care when bleaching your wood (such as gloves and proper ventilation) and make sure that you remove all of the bleach before you place the driftwood on surfaces that could be effected or in areas where there are children or animals.
Giraffe Made of Driftwood

Decorating with Driftwood: DIY Home Décor Projects

Using small pieces of driftwood, and magnets and adhesive from your local craft store, create nature-inspired magnets for your refrigerator or filing cabinet. This is a very easy DIY project that simply involves gluing magnets to a relatively flat spot on the back side of the driftwood.
 
Slightly larger pieces of driftwood can be used to make candle holders that will hold either a single votive or tea light candle, or a row of them. For this project, you will need a piece of driftwood that will balance flat against a tabletop surface. Depending on the length of your wood, use a drill to make holes in the driftwood that are large enough to hold a glass votive candle holder then place the candle holders and candles into your finished project. As long as you can use a drill, this is another DIY project that won’t take you much time and is very easy to complete. I do not recommend placing candles directly into the hole, as this will increase the risk of fire. 
 
Very large pieces of driftwood can be used both inside and outside as benches or plant holders. If the piece is large enough, well balanced and relatively flat, it can be placed as is to provide extra seating or to display plants. If you have a great piece of driftwood that is large enough, but does not lend itself to balanced bench sitting, you can still use it as a bench by leveling it with natural stone supports (like legs), anchoring it in sand (depending on your landscaping), or adding wooden legs that will compensate for height and balance differences along the piece.
 
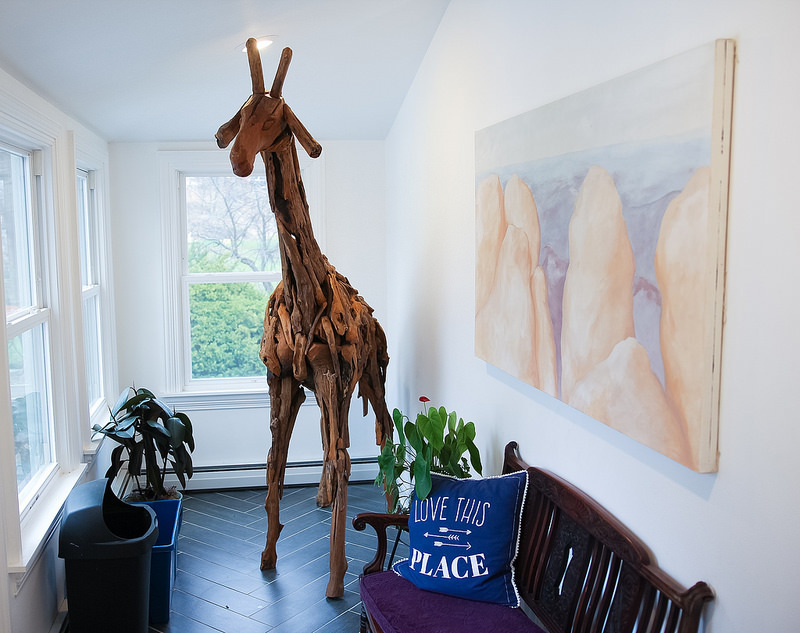
If you are particularly crafty, or know a woodcarver, driftwood can also be carved into sculptures and used as interior décor or in landscaping.

Have you crafted with driftwood? What tips can you share?
0 Comments

How to Untangle Yarn: Guide to Untangling, Preventing Tangles and Saving Your Tangled Projects (#crafting #knitting #crochet)

6/23/2016

0 Comments

 
How to Untangle Yarn
If you knit or crochet, you’ve likely experienced the dreaded task of stopping in the middle of your project to waste a couple of hours untangling your skein of yarn. It's a frustrating, painstaking process that halts progress on your knitting or crocheting project and can bore you to tears. But, here are some tips to make the process a bit more manageable, and to prevent it from happening in the first place. 

How to Untangle Yarn: Is it Worth It?

The first thing to consider when you have a tangled skein is whether or not it is even worth saving. Untangling yarn can take the better part of an afternoon and if you only paid $3.00 or $4.00 for the skein, your time is likely better spent scrapping it and moving on.  
 
This is particularly true if you knit or crochet as a business. If you are selling your wares, then it is not worth spending three hours untangling a skein of yarn that you can replace inexpensively. It will make your hourly income nosedive and will make a project that should take two hours end up taking five, and the purchase price of your item will not go up accordingly. Once you’ve done this once or twice, that adds up to several hours of labor for which you aren’t getting paid.
 
On the other hand, if you were planning to chat on the phone or watch a movie anyways, then mindlessly untangling yarn while you are participating in these activities is a way to keep your hands busy and save the money it would take to replace the skein.
 

How to Untangle Yarn: The Untangling Process

There is no quick, easy way to untangle yarn. Once it becomes a tangled mess, you can be sure that you will spend quite a bit of time partaking in the untangling process. If your yarn has become tangled simply from your skein flopping around while you are knitting or crocheting, then you can comfort yourself knowing that the yarn can be untangled. It has essentially wrapped around itself, generally in loops, and there should be no actual knots that cannot be undone. So, that’s the bright side.
 
If this is the case, then the best way to untangle the yarn is to patiently loosen the tangles as much as possible with a needle or your fingers and undo each tangled loop, slowly progressing towards a tangle-free skein. It is often helpful to find an end and work that single end back through the tangles one at a time. As you untangle the yarn wrap the now tangle-free yarn around a toilet paper tube, paper towel tube, piece of cardboard or even the back of a chair to keep the skein from tangling again.
 
If your yarn has been tangled by a mischievous pet or child, then there might be actual knots and the process can be much more meticulous. If this is the case, then find an end and begin to wrap the tangle-free part as mentioned above. Loosen the tangles as much as possible and work the end through the knots as much as you can. When you reach a knot or tangle that cannot be manipulated, cut that section of the yarn out and tie the yarn together leaving a tail that is at least a couple of inches long. Continue to do this and to wrap the untangled yarn until you have a nice new ball to work with.
 
Prevent Yarn Tangles

How to Untangle Yarn: Options for Saving your Project without Untangling

So, you are in the middle of a project and your skein has gotten all wrapped around itself in tangles. If you don’t feel like untangling it, you can continue your project by cutting the yarn you are using and starting a new skein. If you have another skein of the same yarn, this will work great for color and texture consistency.
 
To start a new skein, cut a tail on the skein you are using that is at least six inches long. Then, either tie the new skein onto that tail (again leaving a long tail on the new yarn) and continue, or leave a long tail on the new skein of yarn and begin knitting or crocheting for about two rows. Then take the tail from the old skein and the tail from the new one and tie them together. Snip the tails after securing the knot, or weave them into your project.
 
If you don’t have another skein of the same yarn, or you want to get a bit creative, this is also a great time to take the opportunity to introduce a new color into your project.

How to Untangle Yarn: Guide to Prevent Tangled Yarn

The best way to avoid spending hours untangling yarn is to prevent it from tangling in the first place. Sooner or later, you will likely still have to tackle some tangles, but you can limit this by trying one of the following methods.

  1. Use a yarn winder to turn your skeins into pull balls before beginning your project. Yarn winders can be purchased at your local fabric or craft store.
  2. Place your skein in a Ziploc bag with one of the bottom corners cut out to feed your yarn through. This will keep your yarn from flipping around on itself as much and also keeps it nice and tidy.
  3. Use a product like the Snapware Yarn-Tainer to keep your yarn organized and tangle-free. The Yarn-Tainer is basically a plastic cylinder (think pasta container) with a hole in the lid to feed the yarn through.
  4. Pull one end of your skein through an empty paper towel or toilet paper tube. Hold the tail down as you begin to wrap your yarn the tube at an angle. After a few rows, the forming ball will hold the tail down. Turn the tube periodically as you wind and you will see a ball begin to form. Once you have finished, pull the tail through the tube and take care to keep it from hiding in the middle of the ball as you take the finished ball of the tube.
  5. Cut a dowel into one foot lengths, then place one of the lengths in a power drill (like a bit). Tape one end of your yarn to the tip of the dowel farthest from the drill. Then, let the drill do the work of rewinding your skein onto the dowel. One note on this one – you will end up with your yarn very tightly wound around the dowel, it works fine, but I prefer a looser ball to work with.
  6. If you prefer to work with the skein as-is, it may help to use the end that comes from the center of the skein. When I use this method, I usually secure the outside tail to the skein with a paperclip or something of that nature so that it won't tangle up with the yarn as the skein flops around.

Your Turn...

How do you keep your yarn from tangling during storage or while working on projects?
0 Comments

How to Find Cheap Purse Handles for DIY Projects

8/24/2014

0 Comments

 
Picture
Whether you simply make handmade purses for your own use, sew handbags to give as gifts or make a wide variety of handcrafted bags and purses to sell online or at craft fairs, it is always helpful when you can save money on the materials you need to sew your unique creations. As anyone who makes DIY purses knows, one of the most expensive components in handmade handbags is a nice set of handles, which is absolutely necessary to finish off the bag and complete the look.

Shopping for purse handles at craft and sewing stores can be cost prohibitive; however, it is easier than you might think to find and buy cheap purse handles that are just as nice as any of the handbag handles you will find in specialty stores.

If you are constantly in search of cheap handles for your DIY projects, try the below tips for finding sturdy, attractive handbag handles that will help you keep your costs down without giving up quality.
Picture
Where to Find Cheap Purse Handles

  1. Look for used purses wherever you can – particularly damaged ones. By taking apart worn, ripped or otherwise damaged purses and using the handles for your own creations, you are reusing materials that might otherwise end up in a landfill and will help you save money.
  2. Look for cheap purses at thrift stores. Thrift stores always have lots of purses for sale, many of which may be stained or ripped, but will have handles that are in great condition. Purses in thrift stores often cost less than a set of handles at a craft store and you can use other pieces as well, such as closures and zippers.
  3. Spend a weekend or two hitting up garage sales. Yard sales are a great place to find cheap purse handles that are attached to unwanted purses. As with thrift store finds, you can also reuse other parts of the bag to save even more money.
  4. Bid on cheap handbag handles on eBay and other auction sites where you can find exceptional deals on handles and other materials. To save even more, look for used purses with good handles or sets of purse handles sold in lots.
  5. Check out Craigslist and other local community listings for used purses or cheap purse handles for sale.
  6. Hit up your local dollar store for cheap purses. I have found some pretty cute round handles this way, but be sure to somehow reuse all of the materials so that the rest of the bag doesn’t go to waste.
Picture
Get Creative to Save Money on Purse Handles

Get creative about what you use for purse handles. By thinking outside of the box, you can create unique handbags with straps and handles made from interesting objects. For example, thrift store neckties make excellent purse straps and dowels from your local home improvement or hardware store can be cut down to create straight purse handles.

Here are some other ideas for making handles out of somewhat random things:

  • Neckties can be used for either a long shoulder strap or a pair of shorter handles.
  • Belts make great shoulder straps.
  • Extra fabric can be rolled into a long tube to be used as a handle.
  • Bandanas can be rolled into handles as well.
  • Sturdy chain necklaces can be used as straps for small bags.
  • Chain (like from the hardware store) left over from DIY projects can also be used for purse straps.
  • Rope can easily be used for straps and handles.
  • Old or damaged scarves can be repurposed as purse straps.

Okay, your turn – what is your fave thing to use or reuse to make some cheap purse handles? Let us know in the comments below!

Free and Cheap Sewing Resources:

Here are some free ebooks I found related to sewing, organizing your craft room (or area) and making handbags.

Remember -- you don't have to have a Kindle to enjoy these ebooks, you can get the Kindle app for free for your smartphone or tablet and read them on whatever you have.

(Check out the two that show you how to make duct tape purses and other stuff!)
And, finally, here are some links to the cheapest print books I could find on Amazon that have to do with sewing purses. One of them has no-sew and low-sew patterns, so that one might be of particular interest to semi-crafty people who don't love sewing.
0 Comments

DIY Brides: Check Out These Paper Flowers I'm Making from Old Books for My Bouquet!

9/27/2013

0 Comments

 
Picture
I'm hoping to get a tutorial up when I have a bit more time, but I at least wanted to share a couple of pics, since I'm a bit busy with wedding prep at the moment!

Miss V and I will be getting married at the courthouse next week, and then having a small reception in November.

I didn't like the idea of fresh-cut flowers for my bouquet, so I put on my green, cheap thinking cap and decided recycled paper flowers were the way to go.

I cut the petals from the pages of an old dictionary, and then pieced the flowers together one petal at a time. I tried making some with glue and some without glue (fastening them with floral wire). While the with-glue flowers came out much better (and have less chance of falling apart), both options would work, if you want to give this a try.

The plan is to mix these with some burlap flowers my mom is sewing up for me - I can't wait to see my finished DIY bouquet!
Picture
0 Comments

10 Uses for Thrift Store Neckties

8/26/2012

0 Comments

 
Picture
Have you ever noticed how many neckties are for sale at thrift stores and yard sales? Once I realized how cheap used neckties were, I started picking them up whenever I had the chance and using them as purse straps on some the handbags I make. Some are made from silk or wool, so they aren’t all appropriate for vegans, but if you sift through the piles, you are sure to find plenty of usable used ties to repurpose into clothing, accessories or home décor.

Recycling neckties and giving them new life is a fun project for crafty folks, but even if you are not that crafty, you will find that the projects below take very little skill…particularly because I’ve linked to a step-by-step tutorial for almost all of them!

How to Repurpose Neckties (as they are)

Neckties are kind of cool just as they are, which makes them easy to repurpose for other uses without the need to cut, sew or otherwise change them. For example, you can use a necktie as a headband or a belt by simply looping them around your head or waist and tying them.

Sewing Projects with Thrift Store Neckties

If you have a sewing machine, or know someone who does, there is almost no end to what you can do with a few repurposed neckties.

Here are just a few examples of how you can upcycle neckties into clothing, accessories or home décor:

1. Make a necktie skirt. Long or short, skirts made from neckties are pretty cute, and they couldn’t be easier to make. Check out this tutorial to learn how to make your own necktie skirt. If you don’t want to have to take your skirt to the dry cleaner, make sure you use washable ties!

2. Make necktie placemats and napkin rings. Again, you will probably want to use washable neckties for this project, since it is awfully nice to be able to wash your placemats every once in a while. Check out this tutorial for step-by-step instructions for making necktie placemats and necktie napkin rings.

3. Repurpose neckties as purse handles or backpack straps. I have personally done this one many times, and my little purses with necktie straps always seem to be popular at the craft fairs. If you aren’t really the handbag type, you can also use thrift store neckties to make backpack straps, as shown in this tutorial.

4. Make a necktie purse, shopping tote or school bag. If you are feeling particularly crafty, you can even make an entire purse, shopping tote or school bag from neckties you pick up at a thrift store or yard sales. This necktie school bag tutorial will show you how it’s done.

5. Make a memorial quilt (or just a regular ol’ quilt). Are you a quilter? If so, you might consider seeking out some neckties to add to your fabric stash. If you lost someone who loved to wear ties, you can make a memorial quilt – like this one – that will keep his or her memory close at hand, or you can simply pick up some used neckties and incorporate them into your favorite quilt pattern.

6. Create artwork to hang on the wall. Mini quilts, framed quilts, neckties attached to a backing and framed – wherever your creativity takes you, used neckties are a great medium for hanging artwork.

7. Sew up some necktie throw pillows or pillow covers. Making necktie pillows is incredibly simple and can be accomplished by either making necktie placemats (using the tutorial above), and then a plain fabric backing, or by making mini tie quilts to use as the front of the pillows.

8. Make a smartphone or music player pouch. Need a new case for your smartphone or MP3 player? Why not whip one up from an old necktie? This tutorial shows how to make a necktie iPhone pouch, which should also work (either as is or slightly modified) for other phones and music players.

Do you have other ideas for cool ways to use old neckties? If so, share them in the comments!

0 Comments

57 Uses for Canning Jars in Your Home, Garden, Garage, Craft Room and More

8/10/2012

2 Comments

 
Picture
Now…I know most of you probably don’t spend your afternoons lovingly crafting homemade jam and canning the abundance of leftover vegetables from your backyard garden (although that does sound like a great way to spend an afternoon!), but you don’t have to be a canner to have dozens of uses for mason jars.

Seriously, canning jars are amazingly versatile, and we can thank the likes of John L. Mason, Henry William Putnam, the Ball brothers, Alexander H. Kerr and a list of other recognizable last names for their contributions to the advancement of glass jar technology. But I know you didn’t come here for a canning jar history lesson, so let’s move right along to the purpose of this post.

Actually, I do have one more quick thing I want to say before we delve into the many uses of the common canning jar: Many of the metal lid options have a lining that contains Bisphenol A (BPA), which is an endocrine disruptor. Keep an eye out for BPA-free options, and if you do end up with lids that contain BPA, I would recommend either swapping them out with BPA-free canning jar lids or using those jars for non-food purposes. If you can’t get around it and have to use the ones with BPA, leave space between the contents and the lid, and make sure you keep the jars upright, to avoid contact.

Tattler Reusable Wide Mouth Canning Lids with rubber rings are one BPA-free option; however, they do contain POM, which has trace amounts of formaldehyde that can be released at high temperatures. While this temperature is nearly twice as hot as a home pressure canner’s maximum temperature, it is still something to consider. Alternatively, you can use all-glass jars with metal clamp closures and gaskets (like these Le Parfait French Glass Canning Jars or these Bormioli Rocco Fido Round Clear Jars). These jars are perfect for food storage and non-food uses, but not all jars of this type are suitable for canning, so check the specs.

Okay, back to the awesomeness of mason jars…

Canning and fruit jars are inexpensive, reusable, easy to clean, way better than plastic food containers and lend themselves well to a variety of uses. They come in an array of shapes and sizes, making them even more versatile, and have a nostalgic side that increases their appeal for use around the house. Basically, they rock.

To show just how much they rock and provide a bit of inspiration for creative ways to use cheap, plastic-free mason jars, here are XXXXX ways to use jars for storage, organization, craft projects, gift giving and more. Keep in mind that you don’t have to start out by purchasing a case of new jars; you can find used jars at garage sales and thrift shops, or you can start out by using the glass jars in which store-bought products like salsa, pasta sauce and jam often come.
Picture
23 Uses for Canning Jars in the Kitchen & Dining Room

  1. Use for making homemade jams and canning produce.
  2. Use as everyday drinking glasses.
  3. Serve chilled desserts, such as vegan chocolate pudding or vegan chocolate mousse.
  4. Use as travel mugs with these cool, BPA-free, to-go drinking lids for mason jars from Cuppow.
  5. Store leftovers (or send some home with your quests).
  6. Take soup to a sick friend.
  7. Make and store vegan vanilla sugar.
  8. Make DIY vegan vanilla extract.
  9. Keep ground coffee fresh after grinding a few days’ worth of beans.
  10. Store dry goods, such as flours, spices, dried herbs, beans, rice, lentils, grains and nutritional yeast.
  11. Store other bulk food items, such as pasta, popcorn, cookies, granola, nuts, cereals, dried foods and all the other goodness you can find in the bulk food section.
  12. Store your sourdough starter.
  13. Store homemade almond, rice or soy milk.
  14. Use as a cookie jar for vegan treats.
  15. Organize and hold cooking utensils.
  16. Use as a spoon rest while cooking.
  17. Store homemade salad dressings, gravies and sauces.
  18. Use as a sugar bowl.
  19. Create a simple centerpiece using canning jars and wild flowers, lemons, pine cones, rocks or other natural elements.
  20. Use a large mason jar to make sun tea.
  21. Avoid plastic containers by using small glass jars for packing lunches. (I use small jars to send oatmeal, cookies, applesauce and more in my partner’s lunch.)
  22. Use larger glass jars to take a salad to work. (Check out this Healthy.Happy.Life. blog post for inspiration and great pictures.)
  23. Store time-saving homemade mixes, such as pancake mix, bread mix, bean soup mix or brownie mix.

7 Uses for Canning Jars in the Bathroom

  1. Store cotton swabs or cotton balls.
  2. Use as a toothbrush holder.
  3. Store homemade bath powder or bath salts.
  4. And sand to the bottom and use as candle holders for scented soy candles around the bathtub or on the counter.
  5. Use to organize and hold makeup brushes.
  6. Keep in the cupboard for saving soap scraps, which can then be used to make laundry soap and such.
  7. Store your salt glow scrub or other exfoliating scrubs.


Picture
5 Uses for Canning Jars in the Office, Workshop or Garage

  1. Use small mason jars as snack containers to keep in your desk drawer at work or in your home office.
  2. Attach the lids to the bottom of shelves in your garage or office (so that you can screw on the jar for under-shelf storage) and use them to store screws, nuts, bolts or office supplies.
  3. Use a canning jar as a pen and pencil holder on your desk.
  4. Grab some small glass jars to organize paperclips, binder clips and other small office supplies.
  5. Use a short, wide-mouth jar as a business card holder.

Picture
8 Uses for Canning Jars in the Craft Room and for Gift Giving

  1. Make a canning jar lamp with these instructions.
  2. Use them for kids craft projects, such as snow globes or sand art.
  3. Use them for DIY projects, like candles, potpourri or holiday decorations.
  4. Decorate them as gift containers for bath salts, recipe kits or other gift ideas.
  5. Create a home spa gift basket with DIY pampering products stored in mason jars.
  6. Make awesome hostess gifts, like a vegan recipe with all of the ingredients layered inside a canning jar.
  7. Use them to store jewelry findings or sewing notions, such as buttons, beads and thread.
  8. Use a jar for cleaning or storing paint brushes.
Picture
7 Uses for Canning Jars In the Garden or on the Patio

  1. Store your saved seeds for next year's garden planting.
  2. Make mini greenhouses.
  3. Use as candle holders or centerpieces for an outdoor dining table.
  4. Create luminaries to line your walkway or driveway to guide guests.
  5. Create simple lanterns that can be hung along the edge or your patio, set on a porch railing or hung from trees.
  6. Use mason jars to serve tea, mixed drinks, beer or wine to party guests.
  7. Use various sizes of canning jars to serve soups, salads or other dishes to guests.

Picture
7 Additional Uses for Mason Jars Around the House

  1. Start a change jar (or dollar jar) to save up for a special indulgence.
  2. Keep your quarters close at hand for laundry day.
  3. Set around the house with scented candles or homemade potpourri.
  4. Keep emergency candles from blowing out.
  5. Drill holes in the lid of a canning jar and use it to store and sprinkle your DIY carpet deodorizing powder.
  6. Create a chore jar with tasks written on slips of paper. (Each family member can draw a paper to see their chore for the day.)
  7. Create a date jar with date ideas to be drawn at random to keep things interesting.

This is definitely not an exhaustive list of all of the cool things you can do with awesomely versatile canning jars, but hopefully this will give you a few ideas and maybe inspire you to come up with even better ways to use mason jars around the house.

What is your favorite way to use canning jars in your home, garage, office or crafting space?


Print Friendly and PDF
2 Comments
    Follow @CheapVeganChick
    Follow on Instagram

    Subscribe by email...

    Enter your email address:

    Delivered by FeedBurner

    Picture
    top vegan blogs
    @cheapveganchick - influencer profile on Dealspotr
    dealspotr.com
    Vitacost.com

    Categories

    All
    Adoptable Animals
    Coupons & Deals
    Diy Crafts
    Diy Household
    Diy Personal Care
    Dollar Store Deals
    Eco Vegan Household
    Giveaways Freebies
    Go Green
    Go Vegan
    Growing Food
    Health Nutrition
    Make Extra Money
    Money Saving Tips
    Random Stuff
    SoCal Vegan & Green
    Store Sales & Matchups
    Vegan Juicing
    Vegan On The Go
    Vegan Product Reviews
    Vegan Recipes & Tips
    Vegan Shopping & Gifts
    Vegan Travel

    RSS Feed


    Vegan Bloggers Unite!

    Reader Faves:

    18 Ways to Use Lemons

    57 Uses for Canning Jars

    Juicing Leafy Greens

    Where to Find Vegan Coupons

    DIY Apple Cider Vinegar Hair Rinse

    Juicing: Potassium Power Smoothie

    11 Vegan Egg Replacers

    Earn with SwagBucks

    Dr. Fuhrman
    Brighter Planet's 350 Challenge
    Picture
    Featured Author
    Featured Author
    view my recipes
    Featured Author
    All recipes are on Petitchef

    Disclosure: Some posts may contain affiliate links, which help support this site.

    Read Site Disclaimer

    Archives

    March 2021
    June 2019
    May 2019
    April 2019
    December 2018
    November 2018
    September 2018
    July 2018
    May 2018
    March 2018
    February 2018
    January 2018
    October 2017
    September 2017
    August 2017
    May 2017
    April 2017
    March 2017
    February 2017
    January 2017
    December 2016
    November 2016
    October 2016
    September 2016
    August 2016
    July 2016
    June 2016
    May 2016
    April 2016
    March 2016
    February 2016
    November 2015
    September 2015
    August 2015
    July 2015
    June 2015
    May 2015
    March 2015
    February 2015
    January 2015
    December 2014
    November 2014
    October 2014
    August 2014
    July 2014
    June 2014
    May 2014
    April 2014
    March 2014
    February 2014
    January 2014
    December 2013
    October 2013
    September 2013
    August 2013
    July 2013
    June 2013
    May 2013
    April 2013
    February 2013
    January 2013
    December 2012
    November 2012
    October 2012
    September 2012
    August 2012
    July 2012
    June 2012
    May 2012
    April 2012
    March 2012
    February 2012

As seen on...
Picture
Picture
Care2
Picture
Picture
Picture
top vegan blogs
Dealspotr
dealspotr.com
Copyright 2011-2021|Cheap Vegan Chick
Photos used under Creative Commons from Robert S. Donovan, RenaudPhoto, Fifth World Art, StarsApart, USDAgov, mattieb, geremology, mahatsorri, nate steiner, lissac1, mikecogh, Joe The Goat Farmer, trekkyandy, andreasivarsson, Z Carlos, nlian, hello-julie, Images_of_Money, ssedro, ReillyButler, eliduke, Gryphonwyck, davide.santoni, dysell, trekkyandy, michaelnpatterson, stlbites.com, Jorbasa, Ducklover Bonnie, TinyTall, barockschloss, Bellafaye Garden, seelensturm, jamesabbott1963, juliejordanscott, cyclonebill, bsperan, Nomadic Lass